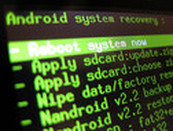
 click to enlarge. click to enlarge. In this tutorial we are fallowing next things: -How to root Samsung Galaxy plus I9001 -How to play Tegra and nVidia games on Samsung galaxy Plus I9001 -Customizations and some advices. This will root Samsung galaxy plus, install Busybox, and the SuperSU application for rights management. There are some things you should know before rooting your phone: 1.Your warranty will be lost. 2. You will have on boot screen one yellow warning triangle each time you start your phone to announce you to be more careful with the apps that you install from now one. Get rid of the yellow triangle after rooting: For that yellow triangle you can buy a cheap app from Google play named Triangle Away if it's annoying for you, or you can download it free from HERE from developers official page. You can find it on market too but not free. Why you shall root your phone? -Custom rooms -TegraK overclocking -Titanum backup -Chainfire 3D (play all games from market even tegra3 games) -And a lot of fun, installing many custom apps that needs root. Step 1 ROOT Samsung Galaxy S plus. 1. Download Root-i9001-Signed.zip from [HERE] or [HERE] or [HERE] 2. Copy file "Root-i9001-Signed.zip" into INTERNAL SD card in a place easy to access it. 3. Turn off phone and enter Recovery Mode. **Recovery Mode: - Switch phone off - Press Vol UP (+) and Power Button - 3 seconds after "SAMSUNG" appears release both buttons - as soon as the "Android out of the Box" appears, press the Menu button. Wait a little Remark: Don't press the Home Button during power on! Otherwise you will enter the RAM Dump mode. If you made it with success until here you shall have now a screen that looks like this image: 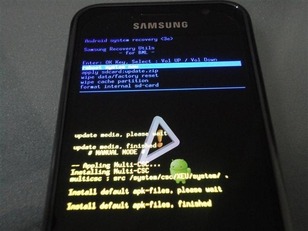 In a Recovery Mode: a) Use Volume button and choose "Apply Update From SDCard". b) Press "Home" button for OK/Submit. c) Use Volume button and choose "Root-i9001-Signed.zip". d) Press "Home" for OK/starting the rooting. Wait a few seconds until the screen show "success" or anything like that. e) Choose "Reboot System Now" and press "Home" button to reboot. Ready, your phone is now rooted. Step 2: Chainfire 3D a).Download Chainfire 3D from Google play [free HERE] (or better go on market with the phone)b) Download Chainfire 3D plugins files: [HERE] or [HERE on XDA developers ] c) Put these plugin zip files at SD card. d) Launch Chainfire3D. 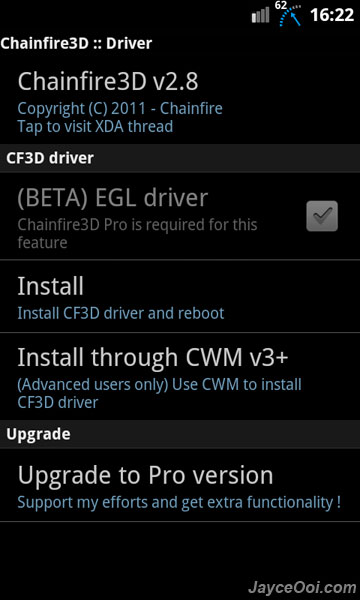 Click to enlarge e) Allow Superuser Request access when prompted. f) Select CF3D driver ~ Install / upgrade / install CF3D driver. g) Then select Install ~ Install CF3D driver and reboot. h) After SGS+ rebooted, select Install plugins / shaders ~ Install plugins and shaders from SD card. i) It will scan sdcard and external_sd for libGLEMU_NVIDIA.zip plugin. 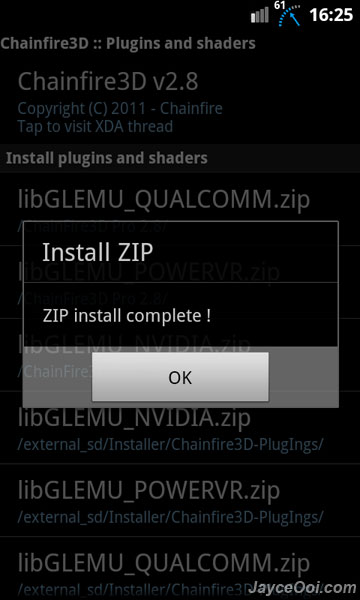 Click to enlarge j) Select each of them to install and you are done. 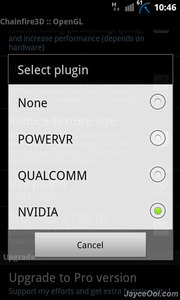
2 Comments
8/21/2012 09:47:19 pm
Great blog ...Thanks for your great information, the contents are quiet interesting.I will be waiting for your next post. 9/21/2012 05:33:09 am
I'm happy that I found your blog while searching the internet for ideas and good content. It's very informative and the quality of your posts is excellent. Leave a Reply. |
Custom [ROM] ROOT
Samsung galaxy S3 sim unlock

Install Google apps and market on non Google devices

Where to find best ROM for HTC sensation

Best Jelly Bean Custom ROM for Samsung galaxy Note N7000
Is it good to Root my phone?

Best way Improve android battery life

Best ROM for galaxy Note N7000
Jelly Bean for Samsung Galaxy S I9000

How to unlock iPhone locked with phone lock code

What is the best [ROM] for HTC sensation XE

HTC sensation XE ROOT and S-OFF

Increase your battery life by "Bump charging".

ROOT Samsung Galaxy S Plus and Gaming with Chainfire 3D

How to root HTC One X easy. One click root.
|

